11 Steps: How to Align Garage Door Sensors (Quick and Easy)

Explore our latest guides and tips designed to help you stay informed and make smarter decisions.

11 Steps: How to Align Garage Door Sensors (Quick and Easy)

Explore our latest guides and tips designed to help you stay informed and make smarter decisions.

Introduction

The sensors in your garage door are a critical safety feature, working to ensure that it opens and closes properly. If your garage door fails to close properly or sounds odd when coming down, the sensors may be causing the problem. Here are 11 instructions that will help you to success in aligning garage door sensors quickly and easily.

Step 1:Understand the Basics

To properly align your garage door sensors, the last thing you need to do is to get familiar with what garage door sensors really are and how they  perate. These sensors are normally situated on each side of the garage door close to the ground. As the door is closing, a beam of invisible light is sent across the opening for safety purposes. When this beam is cut off by anything, the sensors signal for the door to stop and reverse instead of just coming down onto some hapless individual who happens along at that moment.

IMPROVED INTERIOR LIGHTING 1259 x 795 px 1252 x 707 px 28

Step 2: Identify the Issue

 Start by testing whether or not misalignment is in fact the source of trouble. Check if the lights on both sensors are flashing or one of them is off.

Step 3: Check for Obstructions

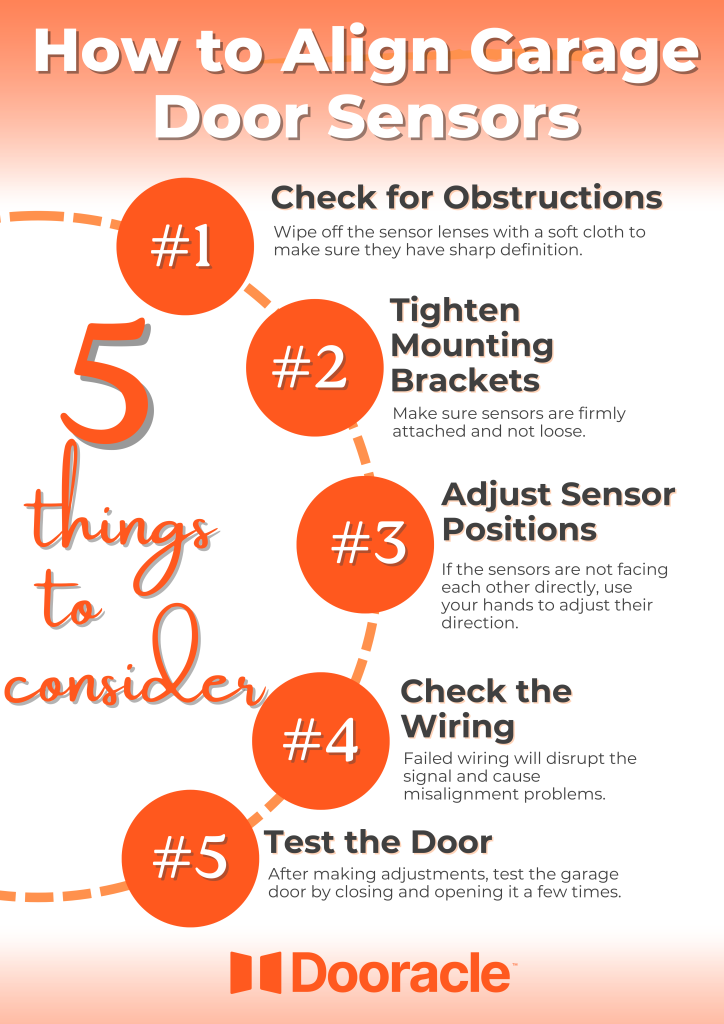
Look around the sensor lens for anything that could be causing a problem, like leaves, dirt, or a web from spiders. Objects this small can affect how well your sensors work. Wipe off the sensor lenses with a soft cloth to make sure they have sharp definition.

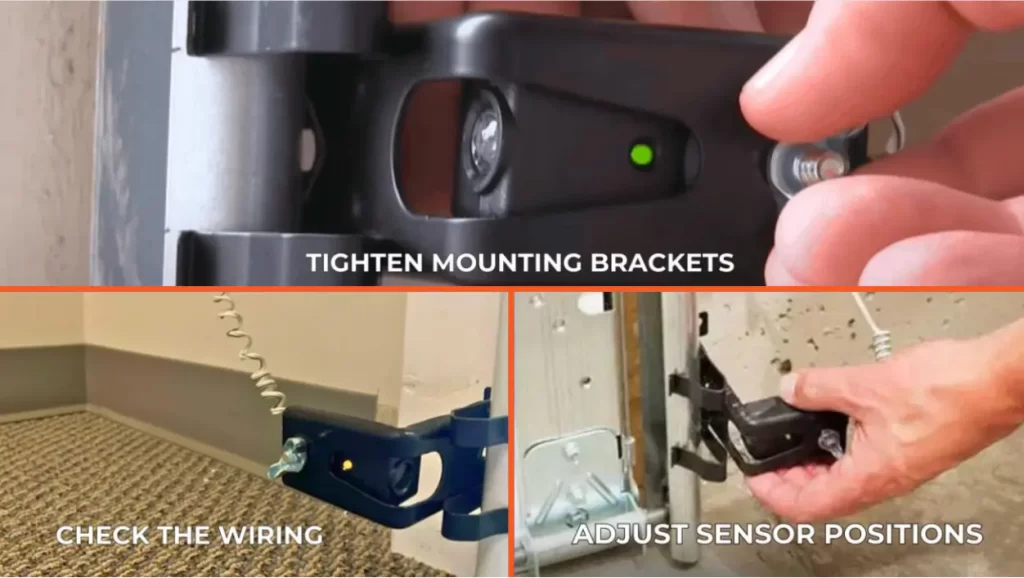
Step 4: Tighten the Mounting Brackets

If screws are not fastened well enough and your brackets get slack mounting it may result in sensor misalignment. You should take a screwdriver using this opportunity to tighten bracket onto the wall firmly. Make sure sensors are firmly attached and not loose.

Step 5: Adjust the Sensor Positions

If the sensors are not facing each other directly, use your hands to adjust their direction. In perfectly aligned position, a beam will travel smoothly from one sensor through the other. It may be necessary to adjust the sensors’ positions very slightly with respect to one another.

Step 6: Use a Level

To make sure the sensors are at the same altitude and facing directly towards each other horizontally, use a level. Different heights may cause  constraints on how well you can see each other.

Step 7: Check the Wiring

Carefully check the wiring that connects the sensors to your garage door opener. There shouldn’t be any cuts, breaks, or exposed wires. Failed wiring will disrupt the signal and cause misalignment problems.

Step 8: Inspect for Sunlight Interference

The sensor’s beam will become disrupted by sunlight or direct glare. If the sensors are hit by direct sunlight, use a small shade to give them cover. Or else alter the angle slightly to minimize it.

Step 9: Test the Door

After making adjustments, test the garage door by closing and opening it a few times. See, if Problems observe it move smoothly without any interruptions. Or more adjustments occasionally may be needed.

Step 10: Consult the User Manual

If you still have trouble, refer to your garage door opener’s user manual.The manual often contains troubleshooting information specific to your
model.

Step 11: Seek Professional Assistance

Time to bring in the experts after all. Garage door professionals can diagnose and fix even complicated alignment issues. You won’t regret it if you need professional assistance.

Conclusion:

By following these 11 steps, you can quickly and easily align your garage door sensors, ensuring the smooth and safe operation of your garage door. Regular maintenance and occasional checks will help stave off any trouble on future alignments for a little while longer.
IMPROVED INTERIOR LIGHTING 1259 x 795 px 1252 x 707 px 29

Contact Us

Should you experience any problems with your garage door while trying to manually operate it, we encourage you to call Uplift Garage. Our friendly and experienced technicians are here to help. Call us today to speak with one of our experienced technicians

More Tips and Guides

Installing a Wind-Resistant Garage Door to Protect Your Home from Storms

A wind-resistant garage door is a great player for your home, especially if you live in a hurricane or strong storm-prone area. Normal garage doors are less resistant to high winds, which means they can be easily compromised, and you may have to deal with expensive repairs around your home afterward. Garage doors resistant to the wind are made for this type of circumstance, shielding your property from strong gusts.

The Reason Garage Doors Openers Lose Their Range and How to Fix It

When you are accustomed to opening the door from a distance, then a garage door opener with a limited range is very problematic. After a time, you shall observe that the remote requires you to get nearer and farther in order for it to work, which is very unhandy and ineffectual. To regain the ease of long-range operation, it is important to understand why garage door openers lose range and how to fix the problem.

Is Your Garage Door Prepared for Winter? Cold-Weather Maintenance Tips

With winter quickly approaching, you want to be sure your garage door is ready for the ice and snow. Garage doors experience additional stress through the winter months, and with that pressure comes an effect on their performance and longevity. It may seem like a no-brainer, but much of what you can do to prepare your garage door for winter is also fall maintenance for a potential spring emergency if not done. It's all about avoiding those surprise frozen parts or sluggish movements that could otherwise leave your garage door virtually useless until you've thawed everything out!